
Siding Services
GET FREE ESTIMATE
Stucco Remediation Contractor Main Line PA
What Is Stucco Remediation?
Repair vs Remediation: The Critical Difference
This distinction is not understood by most homeowners, and the confusion drives the most expensive mistakes in the Main Line home improvement market.
Stucco repair fills cracks, patches spalled sections, and recoats the surface. It addresses appearance. It does nothing about moisture inside the wall cavity. Worse: it can seal the exterior surface and eliminate the last remaining moisture escape path, accelerating the hidden damage.
Stucco remediation removes all stucco material down to the structural sheathing, repairs all moisture-damaged wood, installs correct drainage and flashing components, and applies new cladding over the corrected system. It solves the actual problem.
The expensive mistake: applying repair to a remediation problem. This is how the 2010s stucco repair industry on the Main Line produced the 2020s structural rot epidemic. Freshly patched stucco looks fine while the underlying deterioration continues. By the time interior symptoms appear, the repair cost has grown into a full remediation plus a structural rebuild.
Our blog post on stucco repair vs remediation covers this distinction in detail.
Why 1985-2005 Main Line Homes Are the Highest Risk
Three critical installation components were routinely omitted from stucco and EIFS systems installed on Main Line homes during this era:
- Weep screeds: A metal strip at the base of the stucco wall with drainage slots that allows any moisture entering the system to exit at the bottom. Absent on the majority of Main Line stucco homes from this period. Without a weep screed, moisture that enters has no exit and wicks upward through the wall assembly.
- Window flashing: Sill pans, drip caps, and flexible flashing tape at every window and door opening. Absent on virtually all Main Line stucco homes from this era. Without correct window flashing, every window opening is an active water entry point on every rain event.
- Drainage plane: A water-resistive barrier behind the stucco that allows moisture to drain down and out rather than contacting the structural sheathing. Absent or inadequate on most Main Line stucco homes from this period.
The result: every rain event delivers water into the wall cavity at every window opening. That water has no exit. It accumulates and advances. Pennsylvania’s 44-inch annual rainfall and 50 to 70 annual freeze-thaw cycles accelerate the deterioration. By year 20, the majority of homes in this category have significant sheathing damage. By year 30, structural framing damage is the norm rather than the exception on unaddressed homes.
Active moisture behind your stucco? Call 610-896-6388. | Hynes Construction | 119 Sibley Ave, Ardmore PA 19003 | Free Moisture Consultation
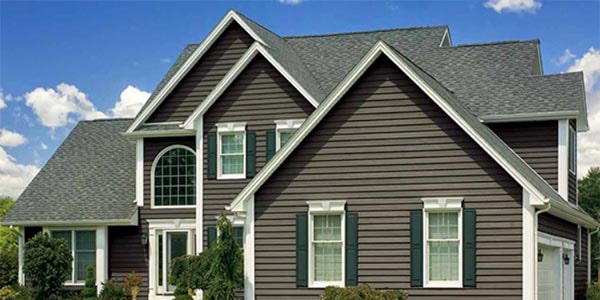
Why Vinyl Siding Is a Smart Choice for Many Main Line Homes
Zero Painting Required – Lowest Maintenance of Any Cladding
This is vinyl siding’s most significant advantage over wood, fiber cement, and stucco. The color is manufactured into the PVC compound – it is not a surface coating. There is nothing to peel, nothing to chip, and no painting cycle every 5 to 10 years. The only maintenance vinyl siding requires is periodic washing with a garden hose and, for stubborn dirt, a low-pressure wash with mild soap. For Main Line homeowners with busy schedules and tight maintenance windows, zero painting for the life of the product is a meaningful benefit.
Moisture and Weather Resistance for Pennsylvania’s Climate
Pennsylvania delivers 44 inches of average annual rainfall, 50 to 70 freeze-thaw cycles per winter, and summer humidity that would degrade untreated wood within a few years. Vinyl is inherently resistant to moisture penetration through the panel surface itself. It does not rot, does not harbor mold growth within the material, and is not affected by insects. The critical moisture management question for any siding system is whether the wall behind the siding is correctly protected, and that depends on the installation, not the product.
Energy Efficiency – Insulated Vinyl Siding Options
Standard vinyl siding is a single-layer panel with minimal insulating value. Insulated vinyl siding adds a contoured EPS foam backing to the rear face of each panel, which increases the effective R-value of the wall assembly, reduces thermal bridging through the wall studs, and increases the panel’s rigidity reducing the hollow sound and flex that some homeowners associate with standard vinyl. For Main Line homes where energy efficiency is a priority, insulated vinyl is worth the modest price premium over standard vinyl and delivers meaningful improvement in both comfort and energy performance.
Cost-Effective Entry Point Compared to Fiber Cement
Vinyl siding installation on a Main Line home typically runs $6 to $12 per square foot installed, compared to $10 to $20+ for James Hardie fiber cement. For a 2,000 square foot exterior, that difference can represent $10,000 to $20,000 in total project cost. For homeowners where the budget difference is material, vinyl siding installed correctly by an experienced crew delivers reliable long-term performance that justifies the investment. For homeowners where the premium material investment makes sense, James Hardie fiber cement is the alternative we recommend.
Wide Range of Styles, Profiles, and Colors
Modern vinyl siding is available in a wider range of profiles, textures, and colors than most homeowners expect. Traditional horizontal lap panels in multiple exposure widths, Dutch lap profiles, beaded lap for colonial applications, board-and-batten vertical panels, and shake-profile panels that replicate cedar shingles are all available. Color ranges have expanded significantly in recent years, with deeper, richer tones now available that were previously only achievable in painted materials. Fade resistance in premium vinyl formulations has improved to 10+ year color stability in most applications.
Warning Signs Your Main Line Home Needs Stucco Remediation
These are the visible indicators that moisture has entered your wall cavity. Each one warrants a professional moisture assessment. Multiple signs together make professional assessment urgent.
Dark Staining or Streaking Below Windows
“Stucco tears” – dark brown or black vertical streaks running down the stucco face below window sills are caused by water running at the window frame-to-stucco joint and depositing minerals and organic material on the surface below. They mark where water entered, not where it ended up. Staining below multiple windows on a home built before 2005 is a near-certain indicator of system-wide window flashing failure.
Soft Spots or Hollow-Sounding Sections
Press firmly against the stucco surface across the exterior, paying particular attention to areas below windows, at wall bases, and near roof-to-wall junctions. Soft or yielding areas in an EIFS system indicate foam saturation. Hollow-sounding sections (tap firmly with your knuckles) indicate delamination of the stucco finish coat from the base coat below, caused by freeze-thaw cycling on moisture-saturated material.
Cracks at Window and Door Corners
Diagonal cracks at 45 degrees from the corners of window or door openings are caused by differential movement between the window frame assembly and the surrounding stucco. They almost always correspond to window flashing failure at that opening and are active water entry points in every rain event.
Musty Odors Inside the Home
A persistent musty or earthy smell near exterior walls particularly around window areas on upper floors is a direct indicator of mold growth inside the wall cavity. By the time this odor is consistently noticeable to residents, mold is typically well-established within the wall assembly, often present for months or years before the smell becomes identifiable.
Interior Water Stains Near Exterior Walls
Brown or yellow staining on interior drywall adjacent to exterior walls, peeling interior paint near window frames, and soft or warped baseboards on exterior-facing walls all indicate that moisture has fully crossed the wall assembly. At this stage, remediation is almost certain – the only question is scope.
Missing Weep Screeds or Kick-Out Flashing
At the base of every stucco wall, you should see a thin metal strip with drainage slots (the weep screed). At every point where your roofline meets a stucco wall, you should see a small metal diverter (kick-out flashing) that sends roof runoff into the gutter rather than onto the stucco surface. If either is absent, moisture entry is occurring systematically on every rain event.
Our Stucco Remediation Process
Step 1: Professional Moisture Inspection
Every remediation begins with a documented moisture inspection. We use deep probe moisture meters that physically penetrate the stucco surface at 15 to 30 strategically located test points around the exterior, and infrared thermal imaging that identifies temperature differentials caused by moisture-saturated areas behind the stucco. Readings above 19 percent moisture content in wood sheathing indicate active damage. The inspection produces a written report with moisture readings by location, thermal images, and photographic documentation. No scope is written and no commitment is requested before the inspection report is in your hands.
Step 2: Full Stucco Removal
All stucco material is removed down to the structural sheathing. This is the step where the actual extent of damage becomes fully visible for the first time. Every scope includes a discovery provision that documents what happens when additional damage is found during removal – how it is assessed, communicated, priced, and approved before additional work proceeds. Our written contracts specify this process clearly.
Step 3: Sheathing and Framing Assessment and Repair
Every section of exposed sheathing is examined for moisture damage, rot, delamination, and structural compromise. All damaged material is replaced before any new cladding is installed. Window rough openings are assessed for framing damage at ledgers and sills. Rim joists and structural framing members in moisture-affected areas are assessed and replaced where necessary. No new cladding goes over damaged substrate.
Step 4: Mold Treatment
Any mold growth discovered in the wall cavity – and it is present in most Main Line remediation projects of any significance – is treated with EPA-registered antimicrobial agents before new materials are installed. In more severe cases, HEPA-filtered air scrubbers are run to capture airborne spores during the remediation process. Mold treatment scope depends on the species and surface area affected, both determined during the wall cavity assessment.
Step 5: Window Re-Flashing
Every window and door opening is re-flashed with modern components that are flexible flashing tape, sill pans, and drip caps before any new cladding is installed. This is the step that original installations almost universally skipped. It is the most critical single step in preventing the new siding system from developing the same moisture problems as the system it replaced. We do not re-flash selectively. Every opening gets full re-flashing.
Step 6: Water-Resistive Barrier Installation
A modern water-resistive barrier with drainage capability is installed over the repaired sheathing across the full exterior. This provides the drainage plane that was absent in the original installation and allows any moisture that enters the wall system to drain out at the base rather than accumulating in the wall cavity.
Step 7: New Cladding Installation
New exterior cladding is installed over the corrected system to manufacturer specifications. Permits are pulled and all required inspections are scheduled as part of the project scope. For HOA-governed properties, materials, colors, and profiles are approved through the HOA review process before installation begins.
Our Vinyl Siding Installation Process
01 Home Assessment and Measurement: We measure the full exterior and assess the condition of existing siding, substrate, window flashing, and moisture barrier. Any signs of moisture damage behind existing siding are documented and addressed as part of the installation scope.
02 Substrate Preparation and Moisture Barrier: Existing siding is removed. The substrate is inspected for rot, soft spots, and flashing failures. Damaged material is replaced before any new cladding is installed. A new moisture barrier is installed over the full substrate to protect the wall assembly.
03 Correct Window and Penetration Flashing: Every window, door, and utility penetration is flashed correctly before vinyl panels are installed. This is the step most installers skip or shortcut, and it is the step that determines whether the wall stays dry for 25 years. We do not skip it.
04 Vinyl Panel Installation with Correct Expansion Gaps: Panels are installed with manufacturer-specified nail hem spacing to allow thermal expansion and contraction. Starter strips, corner pieces, J-channels, and all trim components are installed to manufacturer specifications. No panels are face-nailed tight.
05 Final Inspection and Cleanup: Full inspection of panel alignment, trim integration, and all window and door surrounds. All debris, old siding, and staging equipment were removed. Written warranty documentation provided at project close.
How Long Does Vinyl Siding Last in Pennsylvania?
In Pennsylvania’s climate, high-quality vinyl siding installed correctly by an experienced contractor lasts 20 to 30 years before replacement becomes appropriate. The lifespan variation within that range is driven almost entirely by installation quality, product grade, and the sun exposure the home faces. South-facing elevations receive the most UV exposure and tend to show color fading first. Premium vinyl formulations with higher TiO2 concentrations in the compound deliver better long-term color stability than economy products.
Factors that shorten vinyl siding lifespan on Main Line homes: improper nail hem installation (causes buckling), missing expansion gaps at corners and trim connections, absent or inadequate moisture barriers behind the panels, and failure to flash window perimeters correctly. All of these are installation defects, not material defects. When vinyl siding fails prematurely on a Main Line home, the cause is almost always the installation, not the product.
Why James Hardie Is the Best Choice for Main Line PA Homes
Moisture and Rot Resistant
Fiber cement does not absorb moisture through the panel surface. Water that contacts the face of a Hardie panel runs off rather than being absorbed into the material. The substrate does not rot, does not swell, and does not provide a nutrient base for mold growth within the material itself. This is in direct contrast to wood siding (which absorbs moisture and rots) and to stucco systems (which trap moisture inside the wall cavity when installation components are missing). For the Main Line’s 44-inch annual rainfall and its humid summers, moisture resistance is the single most important performance characteristic a siding material can have.
Fire Resistance – Noncombustible
James Hardie fiber cement is classified as noncombustible under ASTM E136. The siding will not burn and does not contribute fuel in a fire event. This is a meaningful safety distinction from vinyl siding (which melts and can contribute to fire spread) and from wood siding (which is combustible). Many insurance carriers recognize noncombustible siding as a risk reduction and offer premium discounts for homes re-sided with fiber cement. We recommend checking with your insurance provider before installation to confirm potential annual savings.
Freeze-Thaw Stable for Pennsylvania Winters
HZ5-specification Hardie boards are manufactured to withstand Pennsylvania’s 50 to 70 annual freeze-thaw cycles without cracking, heaving, or dimensional change. This is documented in Hardie’s product testing under ASTM C1185 freeze-thaw cycling protocols. Vinyl siding manages freeze-thaw cycling through thermal expansion gaps, which work until they do not, typically after 15 to 20 years of cycling. Stucco cracks under freeze-thaw cycling, particularly when moisture has entered the substrate and freezes inside the material. Fiber cement, manufactured as a dimensionally stable cementitious product, does not have this failure mode.
Pest Resistant
Because fiber cement does not contain digestible organic material at its surface, it cannot be damaged by woodpeckers, carpenter bees, or wood-boring insects. Wood siding is vulnerable to all three, particularly in the tree-canopy-heavy residential environments that define much of the Main Line. This is a maintenance concern on pre-existing wood-sided homes but a non issue on homes reclad with Hardie products.
Architecturally Appropriate for Historic Main Line Homes
The Cedarmill texture profile replicates the wood grain character of original clapboard siding in a way that no other modern siding material does. For the Victorian, Craftsman, Colonial Revival, and Tudor homes that define the architectural character of Ardmore, Bryn Mawr, Narberth, and Wayne, HardiePlank Cedarmill in historically appropriate profiles and colors is indistinguishable from original wood siding at normal viewing distances while delivering 30+ years of maintenance-free performance. Our certifications and affiliations document our experience with historic Main Line properties.
Insurance Premium Savings
Because James Hardie fiber cement is noncombustible, many insurance carriers offer reduced annual premiums for homes with Hardie siding. The savings vary by carrier, policy type, and home characteristics but can represent meaningful annual reductions for some Main Line homeowners. We recommend contacting your insurance provider before your Hardie installation to ask specifically about premium adjustments for noncombustible exterior cladding.
What Replaces Stucco After Remediation?
James Hardie Fiber Cement Siding – Recommended
James Hardie fiber cement siding is the standard replacement cladding on Main Line stucco remediation projects. It is the one material that directly addresses the failure modes of the stucco system it replaces: it does not absorb moisture, it is non-combustible, it is dimensionally stable under Pennsylvania freeze-thaw cycling, and it is manufactured to HZ5 specification for the northern climate. HardiePlank in the Cedarmill texture profile is architecturally appropriate for the Colonial, Craftsman, Victorian, and Tudor homes that define the Main Line. It carries a 30-year non-prorated transferable product warranty and a 15-year ColorPlus finish warranty.
Vinyl Siding
Vinyl siding is a viable replacement in cases where cost is the primary driver and the performance premium of fiber cement is not required. Vinyl siding installed correctly over a properly flashed and moisture-managed wall assembly will perform reliably for 20 to 30 years. It does not carry the same architectural premium for Main Line properties in the upper price range, but it is a practical and durable choice for twin homes, ranches, and smaller properties.
James Hardie Siding Cost Guide for Main Line PA (2026)
| Project Type | Cost Range Main Line PA | Key Variables |
|---|---|---|
| Full re-siding – small home (1,200-1,800 sq ft exterior) | $18,000 to $35,000 | Profile, ColorPlus vs primed, substrate condition |
| Full re-siding – medium home (1,800-2,800 sq ft exterior) | $28,000 to $55,000 | Profile selection, trim complexity, substrate repairs |
| Full re-siding – large home (2,800+ sq ft exterior) | $50,000 to $100,000+ | Complex rooflines, multiple profiles, premium trim |
| After stucco remediation re-cladding | Add $15 to $25 per sq ft to remediation cost | Dependent on substrate repair extent |
| Partial section replacement | $3,000 to $12,000 | One or two elevations, profile matching |
| ColorPlus premium vs primed | Add $1.50 to $3.00 per sq ft | Eliminates first paint cycle (~$4,000-$8,000 value) |
Stucco Remediation Cost Guide for Main Line PA
| Project Scope | Cost Range Main Line PA 2026 | Key Variables |
|---|---|---|
| Professional moisture inspection only | $495 to $1,595 | Home size, probe locations, lab testing if needed |
| Small-to-medium home, sheathing damage only (no framing) | $20,000 to $45,000 | Square footage, number of windows, replacement material |
| Medium home, sheathing plus limited framing damage | $40,000 to $75,000 | Extent of framing damage discovered during removal |
| Large home or significant structural framing damage | $75,000 to $150,000+ | Structural rebuild required, complex roofline |
| EIFS remediation premium vs hard-coat | Add 10-20% to base cost | Foam removal and disposal adds material and labor costs. |
| James Hardie re-cladding after remediation | Add $15 to $25 per sq ft to remediation base | Profile and ColorPlus selection, trim complexity |
| Vinyl re-cladding after remediation | Add $8 to $14 per sq ft to remediation base | Standard lap vs insulated vinyl: trim complexity |
These ranges reflect the Main Line market as of 2026. The only accurate number for your home is a written estimate following a professional moisture inspection. The inspection determines the actual scope of damage, and the scope of damage drives the total cost. We provide the inspection report before you commit to any remediation scope. Free consultation – call 610-896-6388.
How Stucco Remediation Affects Your Home Sale in Lower Merion Township
The Lower Merion Township real estate market has become one of the most sensitized markets in the country to stucco condition at the point of sale. Three things have become standard in Main Line real estate transactions:
- Buyers’ agents now routinely require dedicated stucco moisture tests as a purchase condition on any home with a stucco or EIFS exterior.
- Mortgage lenders on jumbo loans common in Ardmore, Bryn Mawr, Wayne, and Gladwyne price ranges have begun conditioning financing approval on proof of stucco inspection or remediation before approving the loan.
- Home inspectors call out stucco systems from the 1985-2005 era as a standard disclosure item that triggers buyer negotiation on virtually every transaction.
Homeowners who remediate before listing are in a fundamentally different negotiating position. A completed remediation with James Hardie fiber cement replacement removes the most common buyer contingency trigger in this market, provides a transferable Hardie warranty as a selling point, and often returns more than its cost through a cleaner transaction and stronger buyer confidence. We regularly work with Ardmore, Bryn Mawr, and Wayne homeowners and their real estate attorneys to scope, complete, and document pre-sale remediation work within listing timelines.
Contact us to discuss your timeline.
EIFS vs Hard-Coat Stucco: Which Is on Your Home?
| Feature | EIFS (Synthetic Stucco) | Traditional Hard-Coat Stucco |
|---|---|---|
| How to identify | Hollow sound when tapped. Feels slightly soft or yielding. Smooth, fine-grain finish. | Solid sound when tapped. Feels rigid and dense. Slightly rougher texture. |
| Typical thickness | 1.5 to 3 inches including foam layer | 3/4 inch to 1 inch total |
| Moisture behavior | Creates a vapor barrier. Moisture that enters has no escape path. | More breathable. Some drying can occur between wet events. |
| Speed of damage progression | Fast. Trapped moisture stays in foam and sheathing. | Slower. Some drying occurs between rain events. |
| Typical condition in 2026 (1985-2005 vintage) | Severe in most cases – 25+ years of accumulation. | Moderate to severe depending on flashing condition. |
| Remediation complexity | Higher. Foam removal and disposal adds cost. | Moderate. Straightforward removal to sheathing. |
Areas We Serve for Stucco Remediation
Hynes Construction completes stucco remediation projects across all 30+ Main Line communities from our Ardmore office. See the full service area for all locations.
Schedule Your Free Stucco Moisture Consultation
Request online: Free moisture consultation here – response within one business day.
Do not wait: Stucco moisture damage that costs $25,000 to $40,000 to remediate today costs $75,000 to $100,000+ when structural framing damage is reached. A free inspection puts you in a position to make the right decision before the season changes and the damage advances.
Siding Services
GET FREE ESTIMATE
Frequently Asked Questions
Stucco repair patches the surface cracks, spalled areas, and finish coat delamination. It addresses appearance and is appropriate only when professional moisture testing confirms the wall cavity behind the stucco is dry. Stucco remediation removes all stucco down to the structural sheathing, repairs moisture-damaged wood, re-flashes every window opening, installs a drainage-capable water-resistive barrier, and installs new cladding over the corrected system. Applying repair to a wall with active moisture behind it accelerates the hidden damage by sealing the wall shut. The distinction is the most important thing to understand before deciding how to address stucco symptoms on a Main Line home.
If your home was built between 1985 and 2005 with a stucco or EIFS exterior, a professional moisture inspection is recommended regardless of visible exterior condition. Visible symptoms that indicate remediation is likely: dark staining below windows, soft spots at wall bases, hollow-sounding sections, cracks at window corners, musty odors in interior rooms, and interior water staining near exterior walls. Any single visible symptom warrants professional assessment within 30 to 60 days. Multiple symptoms warrant assessment within 2 weeks. See our stucco damage identification guide for a full self-inspection walkthrough.
Stucco remediation costs in the Main Line market range from $20,000 for small homes with contained sheathing damage y, toonly to $150,000 or more for large homes where moisture has reached structural framing over many years. The most common scope for a standard Lower Merion Township or Haverford Township home is $35,000 to $75,000, including moisture inspection, full stucco removal, sheathing repair, window re-flashing, water-resistive-barrier installation, and James Hardie fiber cement re-cladding. The only accurate number for your home is a written estimate based on a professional moisture inspection. Our inspection and consultation are free.
James Hardie fiber cement siding is the most appropriate replacement for the vast majority of Main Line remediation projects. It is non-combustible, moisture-resistant, HardieZone 5 engineered for the Pennsylvania climate, and available in profiles architecturally appropriate for every Main Line housing style. It carries a 30-year non-prorated transferable product warranty. Vinyl siding is a viable alternative where cost is the primary driver.
A standard Main Line single-family home remediation takes 2 to 4 weeks depending on home size, the extent of structural damage discovered during stucco removal, the replacement cladding specified, and permit processing timelines. Projects requiring significant structural rebuilds, complex rooflines, or EIFS foam removal take longer. Permit processing through Lower Merion Township or Haverford Township adds 10 to 15 business days to the schedule before construction begins. All timelines are discussed at the estimate stage before any commitment is made.
Yes, positively, when done before listing. Uninspected stucco on a mainline home is now one of the most consistent buyer contingency triggers and mortgage lender concerns in Chester and Delaware County real estate transactions. A completed remediation with a transferable Hardie warranty removes that contingency, provides a selling point, and typically returns more than its cost through a cleaner transaction. We regularly work with homeowners and their real estate agents to sequence pre-sale remediation within listing timelines.
For homeowners in planned communities or developments with HOA architectural review requirements, HOA approval of the proposed replacement material, color, and profile is required before work begins. Most Chester County and Delaware County HOAs process exterior review requests within 30 to 45 days. Properties within Lower Merion Township’s historic district may additionally require a Certificate of Appropriateness before exterior cladding changes. Hynes Construction handles HOA submissions and permit applications as part of the standard project scope.
A professional stucco moisture inspection uses deep probe meters that physically penetrate the stucco surface at strategic locations, typically 15 to 30 points per home to take direct moisture readings from the wood sheathing behind the stucco. Readings above 19 percent moisture content indicate active damage. Infrared thermal imaging supplements the probe testing by identifying temperature differentials that correspond to moisture-saturated areas between probe locations. The inspection produces a written report with readings by location, thermal images, and specific recommendations. Our inspections are free as the starting point for any remediation conversation.
Yes. Mold found during stucco removal is treated before new materials are installed. Common mold species found in Main Line remediation projects – Aspergillus, Penicillium, and, in more severe cases Stachybotrys is treated with EPA-registered antimicrobial agents applied to all contaminated surfaces. In severe cases, HEPA-filtered air scrubbers are run during the treatment period. The extent of mold treatment and its cost depend on the species identified and the surface area affected. The mold treatment scope is confirmed during the stucco removal phase before proceeding.
Pennsylvania law establishes a 12-year statute of repose for construction defect claims, meaning homeowners have 12 years from the date of original construction completion to hold a builder legally accountable for defective stucco installation. For homes built between 2000 and 2005, some may still be within this window. A documented moisture inspection performed now establishes a current record of the damage that is necessary for any legal claim. We recommend consulting a Pennsylvania construction defects attorney if you believe your home’s stucco damage may have a viable defect claim against the original builder.


TESTIMONIALS
- C
I highly recommend Peter from Hynes Construction. He did work on the flat roof of my house and did a fabulous job. He is a very professional guy, great with follow up, answers your questions and gives great suggestions based on his experience, and Hynes construction is reasonably priced. Services: Power/pressure washing, Roof repair, Roof installation, Window cleaning.
Candance Prvitt
- C
Krissy helped me and provided a competitive quote for a new roof. After going through with 4 different quotes from other roofing companies, I decided Hynes Construction was the perfect company for the job. The roof looks beautiful and I am happy working with Hynes Team and I would recommend them to anyone doing a roof replacement! Services: Roof inspection, Roof installation, Roof repair
Marlain Tassone
- B
Hynes Construction did a fantastic job on my roof. Krissy was professional and easy to work with. They completed my large roof in a day. The crew worked very hard and cleaned up every bit of it. I am extremely happy with my decision of choosing Hynes Construction... Thanks a lot for a wonderful job well done. Services: Roof inspection, Roof installation, Skylight installation
Brigid Goon
- N
They are quick. Handled everything in a proper way. Hynes Team did an amazing job and were very professional and friendly. They did a great job in cleaning. The work quality is fabulous and they offer competitive pricing. Professional and on time, I would definitely recommend Hynes Construction. Service: Window cleaning
Nancy Brown
- M
Hynes is undoubtedly the best roofing company around! Professional and experts in what they do, they are clear and will guide you in a right way. I had a leak in my kitchen which another company told me I needed to replace the whole roof which I was too scared off. Later I called Hynes Team for second opinion and they were able to repair the roof and save me from spending thousands of dollars! So thankful for their honesty Services: Roof inspection, Storm / wind damage roof repair, Roof repair
Michael Reilly
- S
Ridge and Peter both were wonderful and easy to work with. They took the time telling me about the work required and they both were very knowledgeable. I am sure Hynes Team and the company really take good care about the people they work with. I would highly recommend Hynes for any Roof replacement projects! Services: Roof inspection, Roof installation, Roof repair
Stantec
- J
Contacted Hynes Construction for some minor roof repairs. Hynes had someone out in no time and the repairs were done right after, they were really quick and delivered on time as they promised. I would definitely recommend them for your roofing needs! Thanks to Dan for getting our roof repaired and giving us peace of mind Service: Roof repair
Jeffer Punzalan